There's something truly special about preparing a meal for someone you care about, especially when that person is your brother. Think about it, a home-cooked meal, warm and inviting, often speaks volumes without saying a single word. It’s a way to show affection, to share comfort, and to create a memory that will last much longer than the dinner itself. So, when you're thinking about what to make for your sibling, a big, tender piece of roasted meat, a proper "roast for brother," just feels like the right choice, doesn't it?
This kind of cooking, you know, it’s not just about following a few steps. It’s about the care you put into picking the ingredients, the gentle touch as you get things ready, and the patience while it all comes together. A beautiful roast, slowly cooked until it's just right, can be the centerpiece of a wonderful gathering, or even a quiet evening spent catching up. It brings a certain warmth to the kitchen, a smell that promises good things, and a feeling of contentment that’s pretty hard to beat, in a way.
So, if you're ready to put on your apron and create a meal that will truly make your brother feel cherished, we're here to walk you through it. We'll talk about how to pick the best cut, how to get it ready for cooking, and all the little things that make a big difference in the end result. This isn't just about making food; it's about making a moment, a really nice one, for your "roast for brother."
Table of Contents
- Creating Comfort - Your First Steps for a Roast for Brother
- Prepping the Meat - Getting Ready for Your Roast for Brother
- Why Bother with a Rack for Your Roast for Brother?
- How Long Does It Really Take to Cook a Roast for Brother?
- Checking for Doneness - Is Your Roast for Brother Ready?
- What About the Sides? Making Your Roast for Brother a Full Meal
- The Resting Game - Why Patience Helps Your Roast for Brother
- Picking the Perfect Cut for Your Roast for Brother
Creating Comfort - Your First Steps for a Roast for Brother
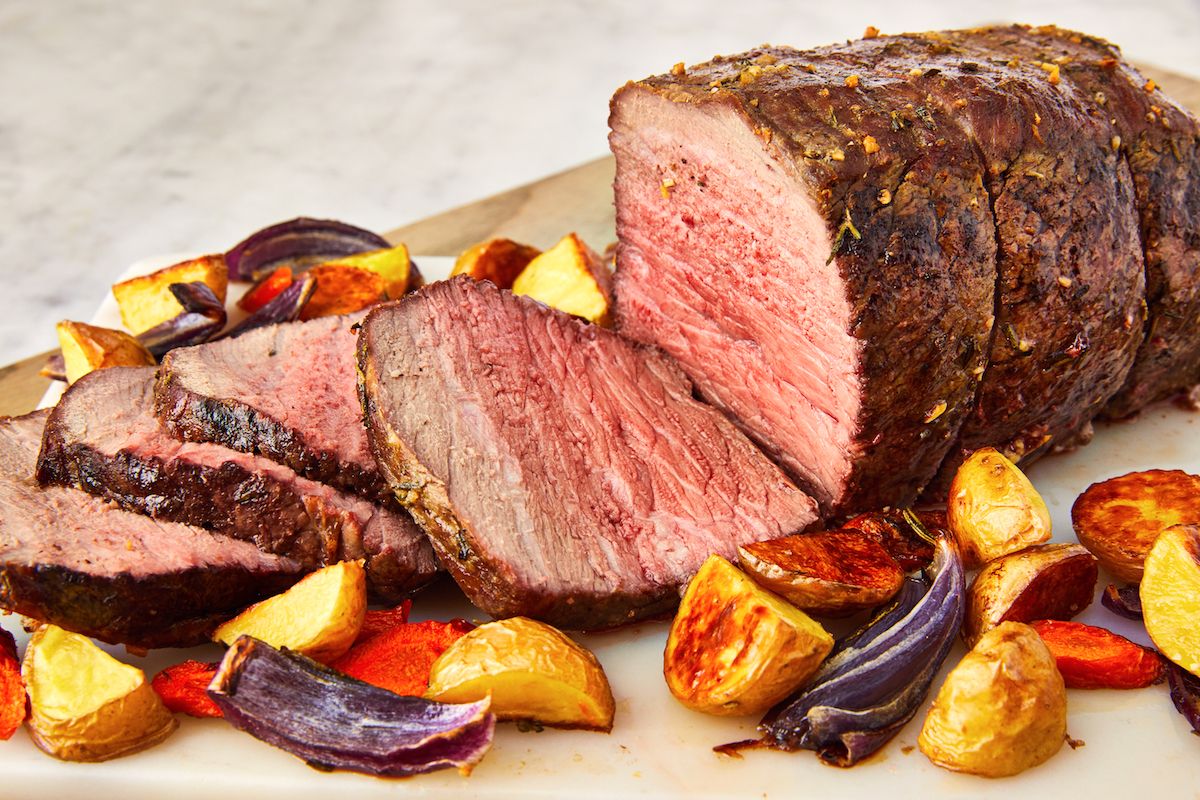
When you're aiming to cook something truly special, like a comforting "roast for brother," getting the oven ready is usually the very first thing you do. It's like setting the stage for all the deliciousness that's about to happen. So, you want to warm up your oven to about three hundred and fifty degrees Fahrenheit. This temperature is pretty good for getting a nice, even cook on a big piece of meat, you know? While the oven is warming up, you can get your main ingredient ready. For a good chuck roast, which is a popular choice for this kind of meal, you’ll want to give it a generous dusting of salt. This isn't just a light sprinkle; you want to make sure it's really covered. This initial seasoning helps build a lot of the flavor that will develop as it cooks, actually.
Once your meat is seasoned, the next step is to give it a good browning in a heavy pot, like a Dutch oven. This browning part is super important because it creates a lovely crust on the outside of the meat and adds so much depth to the overall taste. You want to brown it on all its sides, making sure each surface gets that rich, deep color. It’s a step that really seals in the juices and starts the process of making that "roast for brother" incredibly flavorful. So, don't rush this part; let it get nice and golden brown, it really makes a difference.
After you've given the meat a beautiful color, you’ll pop it back into that same cozy cooking pot. Then, you'll pour in just enough savory liquid, like beef stock, so the meat is about half-submerged. This helps keep it moist and tender as it cooks for a long time. At this point, you also toss in some sliced onions and carrots, along with some lovely green sprigs that smell wonderful, like fresh herbs. These additions aren't just for show; they add layers of flavor to the liquid and become tender, delicious bites themselves. Put a lid on the pot, and then you'll let it cook gently for about three hours. This long, slow cooking time is what transforms a simple piece of meat into a truly melt-in-your-mouth "roast for brother," you know, making it very tender.
- Clara Spera Ginsburg
- Lola Kelly Ripa Daughter
- Cynthia Erivo Alopecis
- Does Steve Kerr Have A Son
- Do Meredith And Thorpe Get Married
Prepping the Meat - Getting Ready for Your Roast for Brother
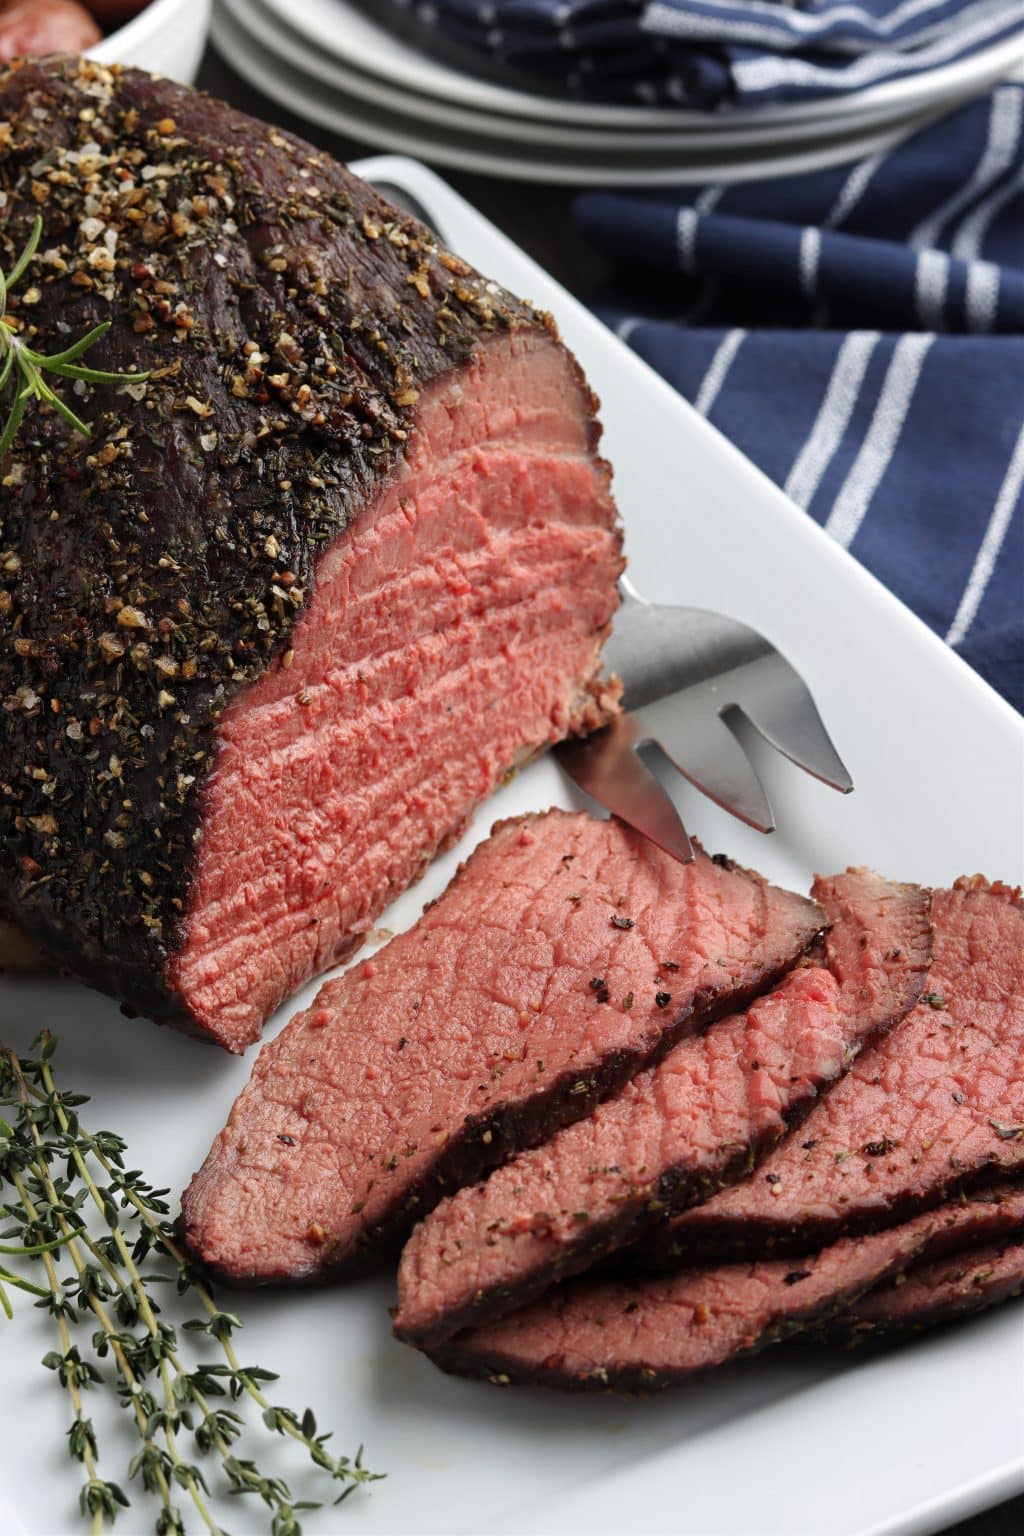
Getting your meat ready for a truly tasty "roast for brother" involves a few simple steps that make a big difference in the end. First off, you’ll want to have some good salt and freshly ground pepper close by. These are your main flavor helpers, so to speak. Take your chosen piece of meat, perhaps a lovely chuck roast, and sprinkle it with a good amount of salt, say about three spoonfuls. This isn't just a light dusting; you really want to rub that salt into the meat's natural lines, making sure it covers every part. This process helps the salt get deep into the meat, preparing it for a really flavorful cook, you see.
Once you’ve got the salt rubbed in, you’ll want to wrap the meat up snugly in some plastic wrap. This step is pretty important because it allows the salt to do its work, drawing out moisture and then reabsorbing it, which helps tenderize the meat and boost its flavor. After it’s wrapped, you’ll put it in the refrigerator. You should let it chill there for at least three hours, but it can stay for up to three days. This long resting period in the cold is a secret to getting a truly tender and juicy "roast for brother." It’s a bit of patience that pays off big time, actually.
When you're ready to start cooking, you'll want to get a wide, sturdy pan, like a heavy skillet, really hot over a high flame for a couple of minutes. While that pan is warming up, you can take your meat and give both its sides a good rub with more salt and a bit of cumin. This spice adds a warm, earthy note that complements the meat beautifully. The hot pan is for searing, which creates a wonderful crust on the outside of the meat, locking in all those good juices. This initial searing is a quick step, but it’s quite important for building flavor and texture for your "roast for brother."
Why Bother with a Rack for Your Roast for Brother?
You might wonder why some recipes suggest using a special rack when you're cooking a big piece of meat, especially for something as important as a "roast for brother." Well, it turns out there's a pretty good reason for it. When you're trying to cook a roast so that it’s done evenly all the way through, you need to make sure the heat gets to every part of it. If the meat is just sitting flat on the bottom of a pan, the part touching the pan won't get the same air circulation as the top. So, that's where the rack comes in, really.
Using a wide, open roasting pan or even a simple baking dish is a good start for getting your roast to cook evenly. But adding a rack takes it a step further. This little platform lifts the meat up off the bottom of the pan. What this does, in a practical sense, is allow the hot air in your oven to move all around the roast, even underneath it. It's like giving the meat a little space to breathe, so to speak, while it cooks. This helps ensure that the heat surrounds the entire piece of meat, leading to a more consistent cook from top to bottom and side to side.
Without a rack, the bottom of your "roast for brother" might end up a bit steamed or not as nicely browned as the top. The rack helps create a lovely crust all over, which adds to the texture and flavor. It also allows any juices or fat that render out during cooking to drip away from the meat, keeping the bottom from getting soggy. So, while it might seem like a small detail, a rack is actually a very helpful tool for achieving that perfectly cooked, beautiful roast that you’re aiming for.
How Long Does It Really Take to Cook a Roast for Brother?
The question of how long to cook a "roast for brother" is a common one, and the answer can vary a bit depending on what kind of meat you're making. For a big turkey, for instance, you're looking at a cooking time of about two and a half hours. During this time, it's a good idea to give it a little attention now and then by spooning some of the pan juices over it. This "basting" helps keep the bird moist and adds even more flavor to the skin. You'll know the turkey is ready when the liquid that comes out looks completely see-through when you make a little cut where the leg meets the upper part of the leg. This clear liquid is a good sign that it’s cooked through and safe to eat, you know.
For a whole chicken, the cooking time is usually a bit shorter, typically around an hour and a half. Just like with the turkey, you're looking for those clear juices when you make a cut between a leg and a thigh. This is the most reliable way to tell if your chicken is fully cooked. Once it’s done, you'll want to take the chicken and any vegetables you cooked with it and move them to a serving dish. Then, cover everything loosely with aluminum foil for about a quarter of an hour or so. This resting period is pretty important, as it allows the juices to settle back into the meat, making it more tender and moist for your "roast for brother."
When it comes to beef roasts, especially those cooked in a pot with liquid, the cooking time tends to be longer, but it's a gentle, slow process. As mentioned earlier, a chuck roast in a pot with liquid might cook for about three hours. This long, slow cooking is what makes the meat incredibly soft and easy to pull apart. The exact time can vary a little based on the size of your roast and your oven, but these times give you a good starting point. So, while patience is a virtue here, the delicious outcome for your "roast for brother" is definitely worth the wait.
Checking for Doneness - Is Your Roast for Brother Ready?
Knowing when your "roast for brother" is truly ready is one of the most important parts of cooking. Nobody wants to serve meat that’s not quite done, or, on the flip side, something that’s overcooked and dry. The best way to tell if a roast is ready, especially for poultry like turkey or chicken, is to check the juices. You want to make a small cut in a thicker part of the meat, usually where a leg joins the main body, and observe the liquid that comes out. If the liquid runs completely clear, without any pinkness, that's a good sign your bird is cooked through and ready to be enjoyed, basically.
For beef roasts, especially those cooked to a specific internal temperature for varying degrees of doneness, a meat thermometer is your best friend. While the text provided focuses on the clear juice method for poultry, for beef, you'd insert a thermometer into the thickest part of the meat, avoiding any bones. Different temperatures correspond to different levels of doneness, like rare, medium, or well-done. This method takes the guesswork out of it and ensures you get the beef exactly how your brother likes it. So, a thermometer is a really helpful tool to have on hand, you know.
Even for pot roasts, where the goal is usually a very tender, fall-apart texture, checking for doneness is still key. While you won't be looking for clear juices in the same way, you'll be able to tell by how easily a fork slides into the meat and how easily it pulls apart. If it resists, it likely needs a bit more time. The idea is to cook it until it's "meltingly tender," which means it should practically shred itself. So, whether it’s a whole bird or a big piece of beef, paying attention to these signs will ensure your "roast for brother" is perfect every time, actually.
What About the Sides? Making Your Roast for Brother a Full Meal
A "roast for brother" isn't just about the main piece of meat; it’s about the whole picture, and that definitely includes the lovely things you serve alongside it. After you’ve taken your main roast out to rest, and you've collected all those wonderful drippings in a baking sheet or a big bowl, you can turn your attention to the accompanying vegetables. This is where you can add even more flavor and make the meal feel truly complete. So, you'll want to turn the heat down to a medium setting in the pan you used earlier, or in a separate one if you prefer, really.
Now, it's time to add in some richness. Put in a bit of butter, and then toss in your prepared carrots, potatoes, and onions. These root vegetables are classic companions to any roast because they absorb all the wonderful flavors from the pan and become incredibly tender and delicious themselves. You'll want to give them a good seasoning with salt and pepper, too, to bring out their natural sweetness and savory notes. You can let them cook gently in the pan, soaking up all the goodness that’s left behind from the meat. This method makes for very flavorful side dishes, you know.
Sometimes, you can even cook the vegetables right alongside the main attraction. For example, with a chicken roast, you might put the chicken and vegetables together on a platter once they're done cooking. Then, you cover them with aluminum foil for about a quarter of an hour or so. This keeps them warm and allows all the flavors to mingle nicely. The idea is to create a harmonious meal where every component adds to the overall enjoyment. So, whether cooked separately or together, these vegetable additions are a really important part of making your "roast for brother" a truly satisfying spread, in a way.
The Resting Game - Why Patience Helps Your Roast for Brother
After all that cooking, it might be tempting to slice into your "roast for brother" right away, but there's a really important step that comes before that: letting the meat rest. This might seem like just waiting around, but it's actually a crucial part of making sure your roast is as juicy and tender as it can possibly be. When meat cooks, especially at higher temperatures, the muscle fibers contract, and the juices get pushed towards the center. If you cut into it immediately, all those precious liquids will just run out onto your cutting board, leaving you with a drier piece of meat, you know.
So, once your turkey, chicken, or beef roast is cooked to perfection, the first thing you do is take it out of the oven. Then, you move it to a cutting board or a large tray that has a raised edge to catch any drips. After that, you'll want to cover it loosely. For a turkey or chicken, aluminum foil works great. For a beef roast, sometimes just letting it sit uncovered for a bit is fine, or a loose foil tent. This resting period allows the muscle fibers to relax and, more importantly, gives those juices a chance to redistribute throughout the entire piece of meat. This means every slice will be full of flavor and moisture, which is pretty much what you want, right?
The amount of time you let it rest depends on the size of the roast. A large turkey might need twenty to thirty minutes, while a smaller chicken might be good after fifteen. For a big beef roast, twenty minutes is usually a good minimum. This patience is a small price to pay for a much better eating experience. It’s a bit like letting a good story settle in your mind; it just gets better with a moment to breathe. So, don't skip this step; it truly makes a difference in the deliciousness of your "roast for brother."
Picking the Perfect Cut for Your Roast for Brother
When you set out to make a truly memorable "roast for brother," the type of meat you choose really does matter. For a classic pot roast, which is a comforting, slow-cooked dish, our top pick for the cut of meat is a boneless chuck roast. There are a few good reasons for this choice, actually. For one, it’s usually not too expensive, so it’s a good option if you’re looking for something that’s both delicious and kind to your wallet. More importantly, this cut is nicely marbled with fat. Those streaks of fat are really important because they melt as the meat cooks, adding so much flavor and keeping the meat wonderfully moist.
This particular cut, the boneless chuck roast, is also perfectly suited for long,
- Hijos Angelina Jolie 2024
- Common Rapper And Jennifer Hudson
- Ellen Degeneres Lives Where
- How Old Is Jodie Sweetin Husband
- Bk Whopper Jr 2 For 5
/pot-roast-200332379-001-56a8c4675f9b58b7d0f4ef96.jpg)